-

-

-

-

-
複製到剪貼簿
- Tracking Indicators and Setup
- Tracking Logs and End Tracking
Tracking Indicators and Setup
Confirm the driver sees their loads and correct indicators to ensure load tracking success. Refer to pictures to understand what drivers may be seeing on their screen.
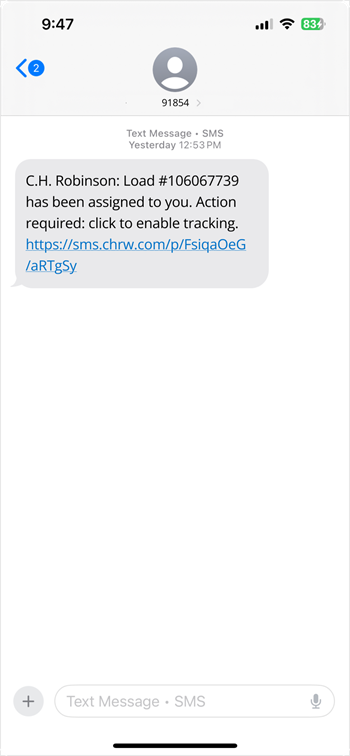
- When the load is assigned, the driver will receive a text message with a link to track.
- The driver clicks the secure link and the Navisphere Carrier app opens.
- If the driver does not have the Navisphere Carrier app downloaded, the link will redirect the driver to the download page for the Navisphere Carrier app.
- If the driver does not have the Navisphere Carrier app downloaded, the link will redirect the driver to the download page for the Navisphere Carrier app.
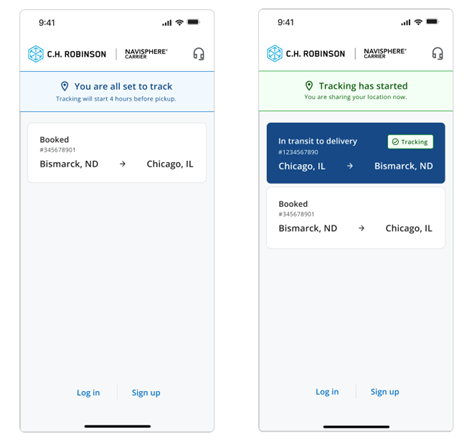
- The app opens to the Active Load screen.
- Tracking permissions need to be enabled upon clicking the link. If the needed tracking settings are disabled, the driver will see a gate screen that will not allow them to move forward unless permissions are enabled.
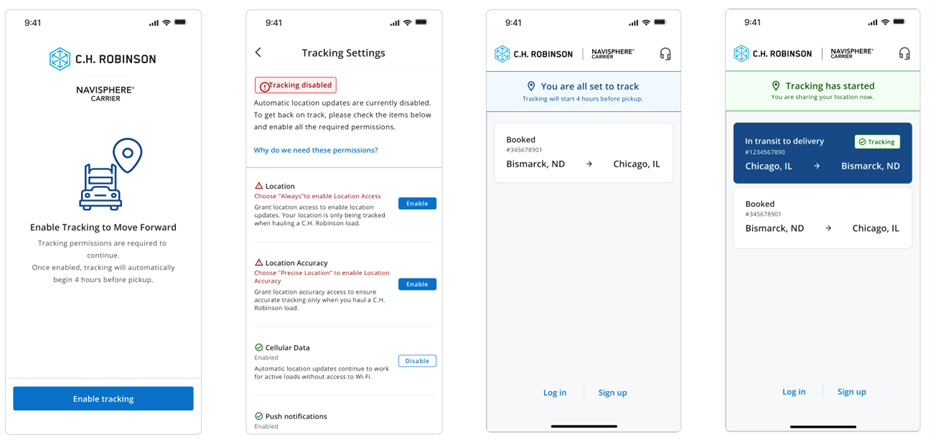
- If the correct tracking settings are enabled, the driver will see one of two status indicators:
- “You are all set to track” this indicates all permissions have been enabled and if the load is over four hours prior to pick up.
- “Tracking has started” if the load is picked up within the next four hours.
- Tracking begins automatically in the 4-hour pre-pickup window once settings are enabled
Tracking Logs and End Tracking
Drivers can view their location history via the Tracking Logs page. Although tracking should end automatically once the driver arrives at the drop off location, the Tracking Logs page features an “End Tracking” button as a failsafe.
- To view location history, click the “View tracking logs” button on the load bubble. This is only available on loads that are being actively tracked.
- The Tracking Logs screen will open. This screen features locations as well as time elapsed since location data was transmitted.
- If tracking does not automatically end when the driver arrives at the drop off, they can press the “End Tracking” button.
- A confirmation screen will appear, showing load information. The driver can press the “Confirm” button to end tracking.
- A confirmation message will appear.
- Important:if the driver chooses to end tracking via the “End Tracking” button, they will be unable track this load again without contacting support.
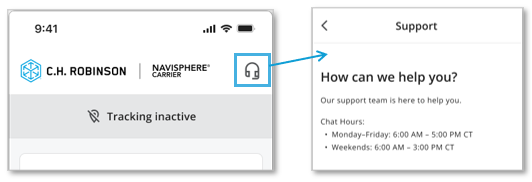
- To contact support, the driver can press the headset icon in the upper righthand corner of the Active Loads screen. Support maintains limited hours.

在本頁
- Tracking Indicators and Setup
- Tracking Logs and End Tracking